


Basic Cake Pops
Cake Pops
Author:Sarah @ Miss CandiQuik
Recipe type: Dessert
Serves: 40
Prep time:
Cook time:
Total time:
Have you made cake pops? Were they a complete disaster?
Yeah, me too. Seriously. We’ve all burned
the heck out of our chocolate, lost a cake ball off the stick, had our
perfectly good cake pops crack 5 minutes later and begin leaking weird
stuff out everywhere! It’s sooo frustrating!
Don’t worry though, it gets better! But let me save you some time and sugar with a few tips…! Cool?
I’m obsessed with cake pops. I think they are the best thing since sliced bread. Whatever that means. Dang Bakerella, look what she started. Just kidding, I love her. By the way, did you know yesterday (February 1st) was National Cake Pop Day? It’s official.
I look back on my first cake
pops/whatever you want to call them and they are sad (see below). Let’s
just say, practice makes perfect.
If you need a laugh, just check out these girls experience when making cake balls for the first time.
My apologies for the long post, shoulda just wrote a book.
Common Issues & Problems with Cake Pops:
FALLS OFF THE STICK!
This can happen because of a few problems. I think the most common is thick coating and it is dragging your cake pop down. Again, smooth coating is one of the most (if not THE most) important parts of successful cake pops! Also, huge cake balls are heavy cake balls. So try to make them moderate size (1″ tall), use a spoon (small cookie dough scoop, coffee scoop, melon baller) or something to measure an even amount for each ball. Also, when I first started making cake balls I would use the whole container (16 oz) of frosting. Now, I start with adding 1/3 of the can and typically use up to 1/2 cup (8 oz) of frosting. You could probably get away with even less than that, but I found this amount is good for me and rolls out smooth.
Also, when dipping your cake pops: dip the stick in the coating first, then insert into the cake ball. Then, when dipping the cake pop make sure that you don’t bump the bottom of the cake ball on the bowl/cup. Finally, don’t swirl the cake pop around in the coating, just dip and get out!
MY CAKE BALLS/POPS ARE NOT SMOOTH!


Tip: use something to measure the amount of cake ‘dough’ you are rolling. I bought this coffee scoop at Target for $5 and it works awesome. Perfectly sized consistent cake balls, every time.
DANG CRACKS!

My Cake Pops are LEAKING CAKE/OIL!

Some call it cake pop *poop*, which I think is a good word for it. After all, this was my initial reaction for it when I began making cake pops a couple years ago. This happens when the cake is pushing it’s way out of the coating through a weak spot, a tiny hole, or a bubble that resulted in a hole. Make sure you coat the entire cake ball in coating. This issue can also be caused by the cake ball and coating temperature difference – see the “cracks” problem. But in my opinion, leakage is better than cracks, so if you have a leak – pull the excess cake off and use a toothpick to seal up the hole with additional coating (luckily they usually occur near the stick/bottom so it shouldn’t be too obvious).
The cake can also be very oily, causing oils to seep out the coating and even down the lollipop stick. If this happens, remember, you can always substitute apple sauce or greek yogurt for oil in your cake recipe!
Also, using less frosting = less oil. And again, you can seal any holes up with a little candy coating. Despite all of that, I still have some cake pops that are oily and the stick literally absorbs the oil (could be the cake flavor/mix) and I’m fine with it, as long as they don’t crack/leak! Colored lollipop sticks would help hide any oil absorbed (these can be purchased online or at specialty cake supply stores).
AIR BUBBLES?!

My coating is THICK & CLUMPY!


You may have scorched your coating. This is a very common issue and happens when the sugar particles become too hot, causing them to carmelize or scorch. When using the microwave, be sure to follow the instructions and heat the entire block of CandiQuik for an initial 60 seconds, then stir very well and heat in 15 second intervals. If using less, adjust the microwave times accordingly. And remember, you can’t go backwards if you scorch your coating, so it’s better to start off slow. Of course, microwaves can heat unevenly and cause hot spots, so stirring constantly in between heating and using short intervals will help this. If melting on the stovetop, make sure you have the burner on low heat and stir constantly.
And of course, I suggest using CandiQuik Candy Coatings. I don’t have to add anything to thin it out and I get a nice, smooth, palatable, thin shell of coating (versus a thick, gloppy mouth full of thick sugar particles).
*If you experience the coating is thicker than normal (commonly caused by humidity/climate), add a teaspoon-tablespoon of solid vegetable shortening (ex: Crisco) to the melted (16 oz) coating. Begin by adding a little and add more if needed.
*Also, if you see just a tiny section that has burned/scorched/became too hot, I have been able to save the rest of the coating by carefully scooping out all of the coating that was burned! Simply spoon it out and allow the rest of the coating to cool slightly, then continue heating in short time intervals. This is usually a microwave heating the coating unevenly.
My Coating is DRYING TOO FAST!
This is usually caused by overheating. See the tip above on thick/clumpy coating. However, whenever I have added oil or powder based food colorings (the only kind to use with candy coatings), it simply dries faster. I cannot explain this, but it just means you have to work faster! It can be good in the case that you don’t have to wait so long when tapping the excess coating off, but it can be hard when making character pops. Also, whenever adding a lot of coloring to your CandiQuik, I add a little Crisco to the coating as well; some brands of the oil based food colors cause it to become slightly thicker than normal. And the more coloring you are adding (for deeper colors), I would recommend adding Crisco as well.
*I recommend oil versus powdered food colors if you have the option. I have had issues with the powders leaving little specks in the coating.
(View my other cake pop recipes)
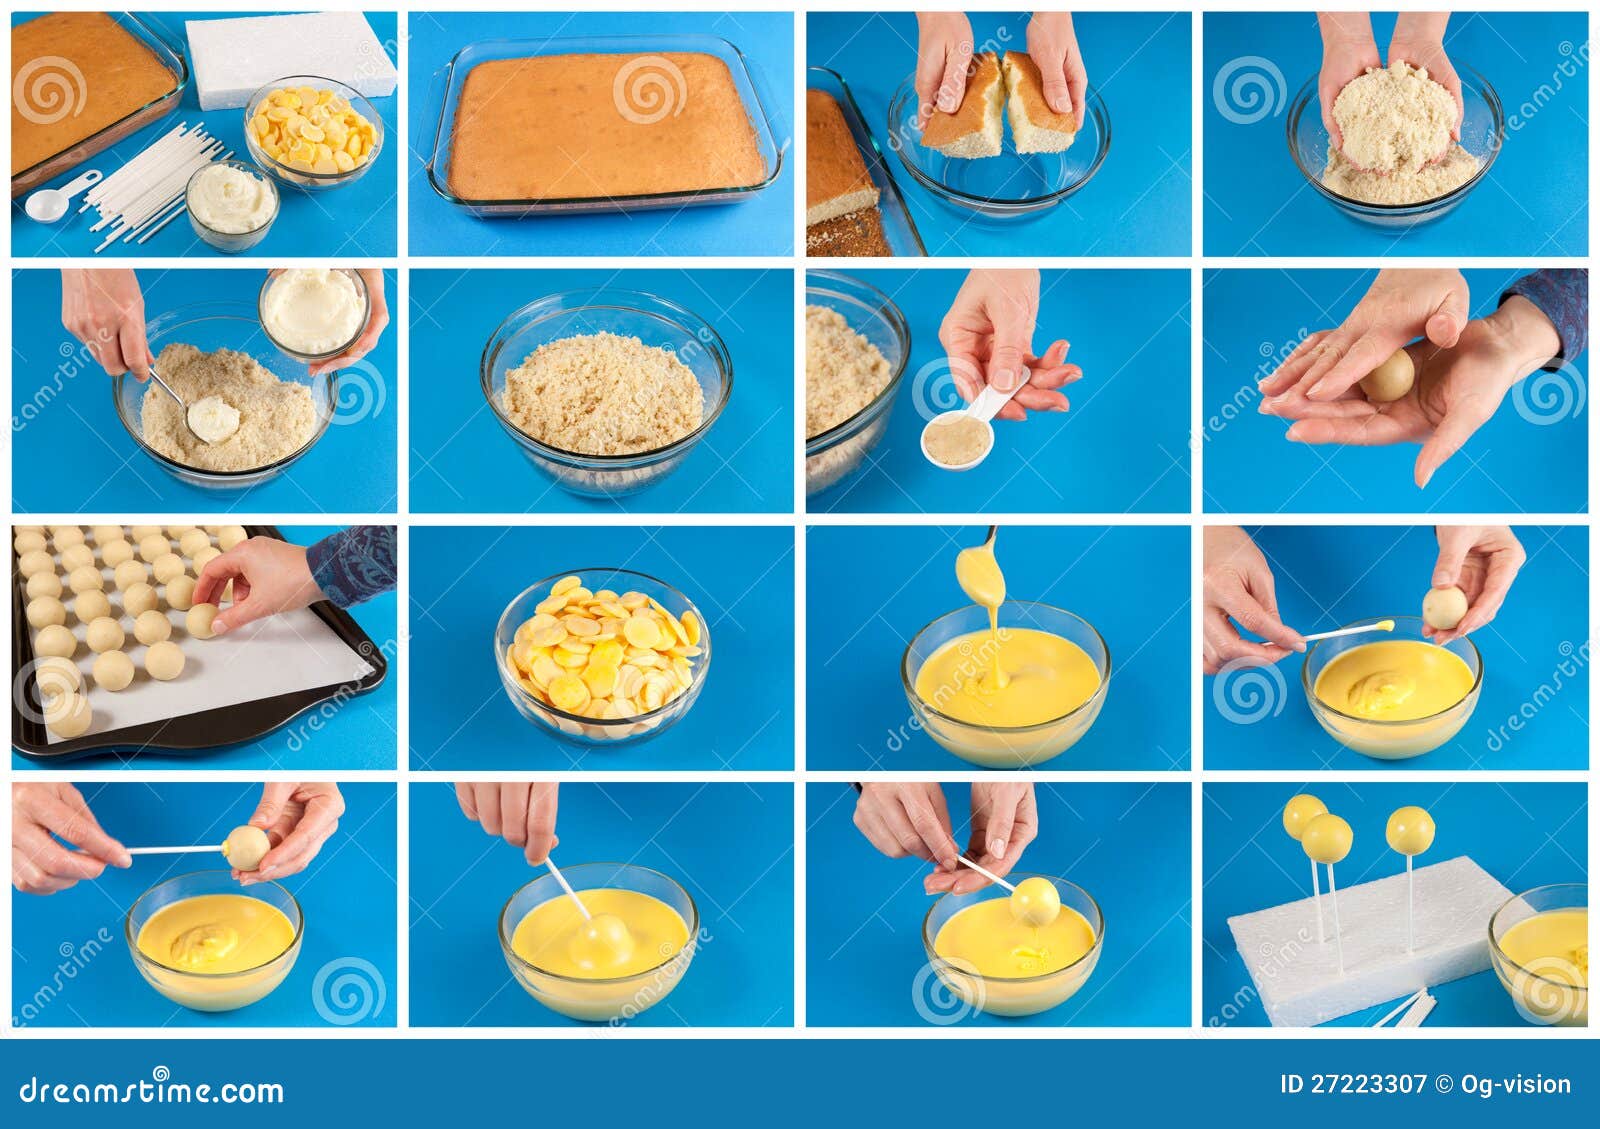
My process of making cake pops
Ingredients
- 1 box cake mix (plus ingredients for cake mix)
- ½ cup frosting (canned or homemade is fine)
- 2 (16 oz.) packages Chocolate and/or Vanilla CANDIQUIK Coating
- Lollipop sticks
- Styrofoam block (to set cake pops in while drying – may be found at any craft store)
- Optional: sprinkles and/or food coloring (oil or powder based only. Found at your local craft or specialty baking store)
Instructions
- Prepare and bake cake mix as directed on box. Allow to cool slightly, at least 30 minutes (longer if not in a hurry).
- Crumble trimmed* cake into a large bowl. Add frosting and mix thoroughly with hands. (*see notes)
- Chill mixture approximately 2 hours in the refrigerator.
- Measure cake mixture and roll into 1” sized balls. Place on a wax paper lined baking sheet. You may need to place the cake balls back in the fridge for 20-30 minutes, allowing them to firm up.
- Insert a lollipop stick into each cake ball. You can dip the lollipop stick in a small amount of coating before inserting into the cake ball if you have had issues with it falling off the stick. *Tip: remove a few cake pops at a time to dip, storing the others in the fridge until ready.
- Melt CANDIQUIK according to directions on package, being careful not to overheat. If desired, add oil or powder based food coloring; stir until blended. To Dip: you can use the tray that the coating comes packaged in, or a deep microwaveable bowl or a mug/cup works great.
- Dip cake pops in melted CANDIQUIK; allow excess coating to drip off (hold at a ~30 degree angle allowing the coating to drip off the bottom and not drip on the stick) by tapping the stick and place in the Styrofoam block to set.
- Decorate cake pops as desired with candy coating and/or icing and sprinkles.
Notes/Tips
For smooth cake balls, trim off the edges and
bottom of the cake. Mix crumbled cake thoroughly with frosting. For best
results, use your hands to thoroughly combine the cake and frosting
together.


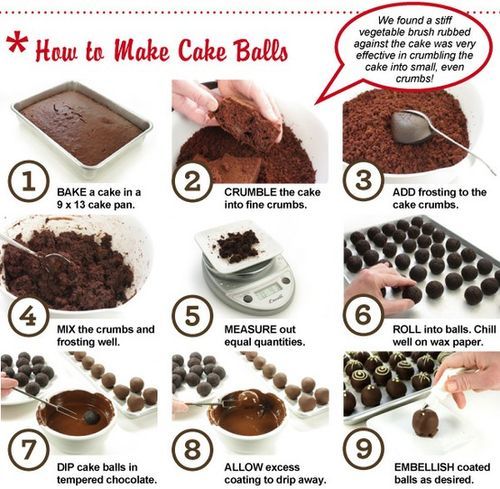
Please also check out how to make basic cake balls: cake ball recipe
Ok, this next picture is slightly embarassing…

Well, they didn’t have cracks (yet) and they are still on the stick, right?!?!
Tips & Tricks with CandiQuik:
Melting Instructions:
- Microwave: Melt CANDIQUIK® Candy Coating in Melt & Make™ Microwave Tray for 1 minute. Stir well. Note: Product retains shape until stirred. If not completely melted, continue to microwave for 15 second intervals, stirring after each interval until smooth. If melting less than entire package, reduce microwave time accordingly.
- Oven: Preheat oven to 250°F, TURN OVEN OFF. Place CANDIQUIK® Candy Coating in Melt & Make™ Microwave Tray in oven for 10-12 minutes. Remove tray from oven and stir until smooth.
- Sauce Pan: Break CANDIQUIK into squares. Place in heavy sauce pan. Melt over LOW heat about 10 minutes, stirring often until smooth.
Tips & Tricks with candy coatings:
- ALWAYS use dry utensils. Moisture will cause product to become hard or lumpy.
- STORE unopened packaging in a cool, dry place (55°-70°F). If opened, store in an air-tight container.
- REHEAT and reuse CANDIQUIK multiple times! Just store in an airtight container/plastic bag between uses.
- DO NOT overheat. Overheating will cause product to scorch or caramelize.
- DO NOT add water, milk, oil, margarine or butter to Candy Coating.
- DO NOT use water-based colorings or flavorings.
- CANDIQUIK may be colored or flavored using oil-based or powdered colorings or flavorings.
Another Ideas :-


This one using printable toppers - cakenya dekat skirt tu >_<

~* Selamat Mencuba *~


No comments:
Post a Comment